|
|
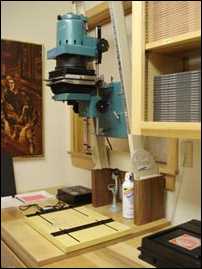
My enlarger is a Beseler Model 23-C, which dates back to the 1970s or 80s. It had seen some wear and tear when I got it, so I completely dismantled it, repainted, repaired, and refurbished where necessary. Because this is such a popular enlarger, Beseler still makes repair parts.
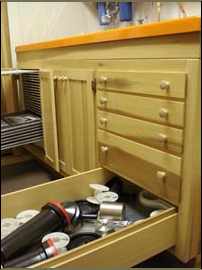
I keep my paper safe at the right of the enlarger, and the timer and contrast filters to the left. There are dodging and burning tools in the drawer under the enlarger. A can of compressed air and a grain focuser sit under the enlarger.
I tend to use Ilford Multigrade IV RC Deluxe paper with a pearl finish, and develop it with Ilford and Kodak chemistry (Ilford Multigrade Developer, Kodak Indicator Stop Bath, Ilford Hypam Fixer), and I use Kodak Brown toner for toning.
|
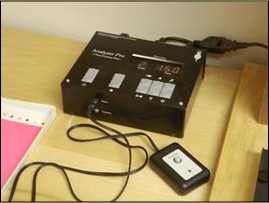
I use an electronic timer, an Analyser Pro F-Stop Enlarging Meter, made by RH Designs in England. It has a mouse with a button and a light sensor. I've calibrated the unit to my particular printing paper (it can store data on 8 different papers). To use it, I place a negative in the enlarger, turn on the lamp, and use the sensor to take a reading on the easel at the lightest and darkest parts of the negative (actually, you can take up to 8 measurements). As I take measurements, LEDs light up on the unit. By evaluating the LEDs, I can adjust the timer to a particular exposure and contrast grade prior to printing. This is a very sophisticated timer, and it allows me to predict an optimal exposure time and contrast grade, then it will calculate the times necessary to print a test strip with fine steps between each exposure.
|
|
|
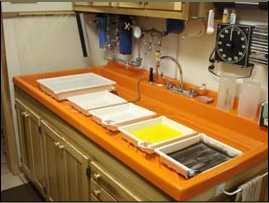
I have a six-foot fiberglass darkroom sink. In this image I am using 4 small trays for processing, and a larger tray for rinsing. The small (8" x 10") trays are for (from right to left) developer, stop bath, fixing bath 1, and fixing bath 2. Using a two-bath fix is more efficient than using a single bath. To do this you mix two separate fixing baths at the same concentration recommended by the manufacturer. The paper is placed in the first bath for half the recommended time, then it goes into the second bath for the remainder of the time. When the first bath is depleted, it is discarded and replaced with the second bath and a new batch is mixed for the second bath. After 5 cycles, both baths are discarded.
|
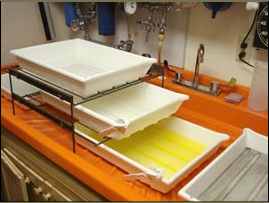
When I need larger developing trays to process larger sheets of paper, I use a Leedlal tray ladder to stack the trays so I can fit them all fit in my sink. 11" x 14" trays are shown, but I can accommodate 16" x 24" trays.
|
|
|
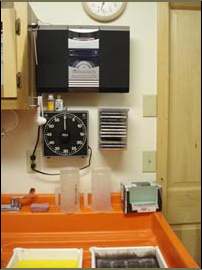
On the wall, above the right side of my sink, I have mounted a Gralab timer, a CD-player/radio, and a small rack for CDs.
On the right end of the upper cabinet, are holders for a thermometer, plastic measuring spoons, and tongs. The upper cabinet contains various photography books.
Photo wipes, graduates, and a sponge sit on the rear shelf of the sink.
|
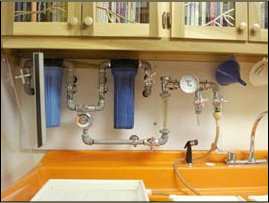
On the wall, above the left side of the sink, is a filter panel. It has a separate 0.5 micron filter for the hot and cold water supplies.
All the water in the darkroom is filtered, for the two outlets on the filter panel, as well as for the other sink faucet and the spritzer.
The panel also has a temperature control valve, a backflow preventer, a flow meter, and various flow-control and shut-off valves.
|
|
|
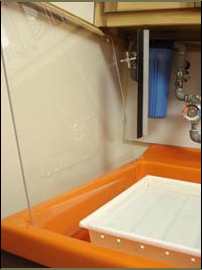
To the left of the sink is a plexiglas squeegee panel for removing excess water from prints. The squeegee hangs on a hook from the bottom of the upper cabinet when not in use.
|
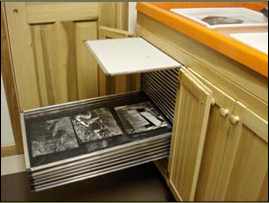
In the sink's base cabinet, at the left end, are a number of print drying screens. They simply slide out when needed. When not being used, they are hidden from view by two cabinet doors. The components for the aluminum frames (plastic corners, aluminum sides, vinyl splines), and the plastic screening, are from a building-supply center.
The upper frame contains a solid fill, rather than a screen, to prevent anything from splashing onto the drying prints.
|
|
|
The various darkroom chemicals are stored in the center of the sink's base cabinet. The drawers at the right end of the cabinet contain a notebook, easel, small developing trays, and various other supplies and equipment.
The bottom drawer contains my Paterson film developing tanks and reels.
|
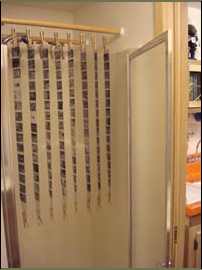
There is a small bathroom to the left of the darkroom sink. I use the shower stall for hanging up film to dry.
I use Ilford FP-4+ film, and develop it with Ilford and Kodak chemistry (Ilford Ilfotec DD-X Developer, Kodak Indicator Stop Bath, Ilford Hypam Fixer, and Kodak Photo-Flo 200).
The bathroom contains a powerful, two-speed exhaust fan. When in use, it pulls air into the darkroom (there is a light-tight grill that allows air to enter the darkroom from the office), across the darkroom, into the bathroom, then expels it outdoors.
|
|
|
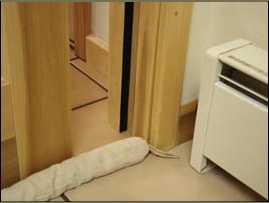
The entry to the darkroom (from the office/studio/workroom) is a pocket door that slides into a felt-lined, light-tight groove.
At the bottom of the door, I use a draft-stopper to keep out the light.
The floor is ceramic tile, and I use two layers of 3/8"-thick industrial anti-fatigue mats (from U-Line) between the wet and dry sides. This allows me to work comfortably in the darkroom for hours while just wearing socks.
|
|
|

